Guide to Windows PowerShell 4.0

June 22nd, 2014 by Rossy Guide

Basic description and guidance for use:

Windows PowerShell is a task automation and configuration management framework from Microsoft, consisting of a command-line shell and associated scripting language built on the .NET Framework. PowerShell provides full access to COM and WMI, enabling administrators to perform administrative tasks on both local and remote Windows systems as well as WS-Management and CIM enabling management of remote Linux systems and network devices.

In PowerShell, administrative tasks are generally performed by cmdlets, which are specialized .NET classes implementing a particular operation. Sets of cmdlets may be combined into scripts, executables, or by instantiating regular .NET classes. These work by accessing data in different data stores, like the file system or registry, which are made available to the PowerShell runtime via Windows PowerShell providers.

Microsoft Windows PowerShell 4.0 is the version of the PowerShell scripting language found in Windows Server 2012 R2. Windows PowerShell 4.0 is backward compatible. This means that cmdlets, providers, modules, snap-ins, scripts, functions, and profiles that were designed for Windows PowerShell 3.0 and Windows PowerShell 2.0 work in Windows PowerShell 4.0 without changes. Some of the new features in Windows PowerShell 4.0 include:

o Support for workflow and remote script debugging
o Improved workflow authoring experience to make it more consistent with script authoring
o Added PipelineVariable as a common parameter
o Better support for downloading updatable help by using Save-Help and Update-Help in offline scenarios
o Updated version from 3.0 to 4.0
o Several bug fixes and performance improvements

Windows PowerShell Integrated Scripting Environment. Windows PowerShell ISE in Windows Management Framework 4.0 introduces:

o Support for Windows PowerShell Workflow debugging
o Support for remote script debugging
o IntelliSense support for Windows PowerShell Desired State Configuration resources and configurations

PowerShell 4.0 comes preinstalled for Windows 8.1 and Windows Server 2012 R2, but there are those who still prefer Windows 7 and other earlier server operating systems. So, it’s great to see that Microsoft has finally released PowerShell 4.0 as part of the Windows Management Framework (WMF) 4.0 release. The release supports Windows 7, Windows Embedded Standard 7, Windows Server 2008 R2, and Windows Server 2012.

Windows PowerShell 4.0 is part of the Windows Management Framework 4.0, which includes the following:

o Windows PowerShell
o Windows PowerShell ISE
o Windows PowerShell Web Services
o Windows Remote Management
o Windows Management Instrumentation
o Server Manager WMI provider
o Windows PowerShell Desired State Configuration

Windows Management Framework 4.0 supportability matrix

Operating system

Windows PowerShell 4.0 available

Prerequisites

Installation file

Windows Server 2012 R2 Built-in N/A N/A
Windows 8.1 Built-in N/A N/A
Windows Server 2012 Yes, part of WMF 4.0 .NET 4.5 (built-in) x64: Windows8-RT-KB2799888-x64.msu
Windows 8 No, user must upgrade to Windows 8.1 N/A N/A
Windows Server 2008 R2 Yes, part of WMF 4.0 Windows Server 2008 R2 SP1, .NET 4.5 x64: Windows6.1-KB2819745-x64-MultiPkg.msu
Windows 7 Yes, part of WMF 4.0 Windows 7 SP1, .NET 4.5 x64: Windows6.1-KB2819745-x64-MultiPkg.msu, x86: Windows6.1-KB2819745-x86.msu


Installation:

o Verify that all prerequisites are installed according to the Windows Management Framework 4.0 supportability matrix above.

o Run the installation file applicable to the operating system

o Reboot the computer, start Windows PowerShell and verify that the output of $PSVersionTable shows 4.0 as the value of the PSVersion property

FTP Configuration in Sysax Multi Server

June 14th, 2014 by Rossy Guide

Setting up web-based administration

Sysax server can be administered locally (using HTTP) or remotely (using HTTPS, in the professional edition or above) using a web browser. A username and password must be specified to validate access to the browser based administration interface.

Web Administration Interface

The server also provides an administration API for local (Professional Edition and above) and remote (Enterprise Edition and above) access.

API Administration

Configuring Server Startup

To configure the server startup, open the Sysax Multi Server Administrator program. The Sysax Multi server control panel is displayed as follows.

Sysax Multi Server Control Panel

On the below Automatic Startup screen, you are presented with the following two options:

o Automatically start the server on Windows boot-up

o Manually start server from the administrator panel.

Select the appropriate startup method and then click Save button. 

Server Startup Mode

Configuring Server Logging

You can choose to optionally record server activity to a server log file. After you make your selections on the Automatic Startup screen and click Save, then select the Server log tab. The server log dialog box is as follows.

Server Log

On the server log tab, to enable recording of server activity to a log file, make sure that the Enable record to log file is checked. Then enter the path in the Path field (or use the Browse button) to identify the log path.

In addition, on the Server log tab, you can indicate a maximum size of file that triggers a rollover to prevent the file from becoming too large.

To specify the maximum size of the log file, please verify that Roll over this log file after is checked or not, then enter the size in bytes(or use the up and down arrows). Finally click Save to preserve your settings.

Details of RSA Public-Key Cryptography

June 8th, 2014 by Rossy Guide

What is this?

The RSA algorithm was publicly described in 1977 by Ron Rivest, Adi Shamir, and Leonard Adleman at MIT and the letters RSA are the initials of their surnames.

RSA is one of the public-key cryptography systems and it is widely used for secure data transmission. Public-key cryptography is also known as asymmetric-key cryptography, to distinguish it from the symmetric-key cryptography we have studied thus far. In such a cryptography system, encryption and decryption are carried out using two different keys. The two keys in such a key pair are referred to as the Public Key and the Private Key.  For the public key cryptography, all parties interested in secure communications publish their public keys.

Also, Public-key cryptography facilitates the following tasks:

o Encryption and decryption allow two communicating parties to disguise information they send to each other. The sender encrypts the information before sending it and the receiver decrypts the information after receiving it.

o Tamper detection allows the recipient of information to verify that it has not been modified in transit.

o Authentication allows the recipient of information to confirm the sender’s identity.

o Also, nonrepudiation prevents the sender of information from claiming at a later date that the information was never sent.

Tutorial for creating RSA:

RSA algorithm involves three steps: key generation, encryption and decryption. A RSA key pair consists of the following:

o The modulus n, a big integer which is equal to the product of two big prime integers, p and q.

o The public exponent e.

o The private exponent d. d is such that ed = 1 when taken modulo p-1, and also when taken modulo q-1.

o The first factor p.

o The second factor q.

o The value dp = d mod p-1.

o The value dq = d mod q-1.

o The value q’ = q-1 mod p.

The public key contains only n and e. And the private key contains all of the values specified above.

For creating a RSA key pairs, please follow the steps below.

Create RSA private & public keys:

Use OpenSSL to generate the key pairs. In the command-line tool, enter the following.

openssl genrsa -out rsakey.pem 2048         
[will generate a 2048-bit RSA private key with all the proper encoding]


In the command-line tool, enter the following.

openssl rsa -in rsakey.pem -pubout
[will print out the public key, there again with the encoding done]


Failure to Send HTTP Request

June 2nd, 2014 by Rossy Guide

What is this error?

If the client computer has the Windows firewall turned on and the required exceptions are not made, then it may report in the CCM.log on the site server that it couldn’t connect to that machine.

If the client machine is behind a firewall that does not allow access to the SCCM server or the local distribution point, then it will be unable to get the files it needs to install the client. For example, on one remote site, access was restricted by the firewall to certain servers only, and the SCCM servers were not included. The SCCM server was able to copy the ccmsetup.exe to the client machine and start it, but it was then unable to get the files it needed from the local DP to install the client. This resulted in the following error in the ccmsetup.log on the client:

Failed to send HTTP request.

Look at the ClientLocation.log to see if it was assigned to your site. If so, then look in the LocationServices.log to see if it found the default management point.  Then check ClientIDManagerStartup.log to see if it is registered.  Check Ccmexec.log for Http errors.

How it can be resolved?

The client will need to get policy from the MP to get configured before all of the client tabs will be available.  You can use Policy Spy from the toolkit to check on policy.  If the client is a new install it can take up to 30 mins depending on your environment to get policy.  Run the install and verify that the client installed correctly in c:\windows\system32\ccmsetup\ccmsetup.log and then allow some time for policy if it can communicate with your MP and is installed correctly.

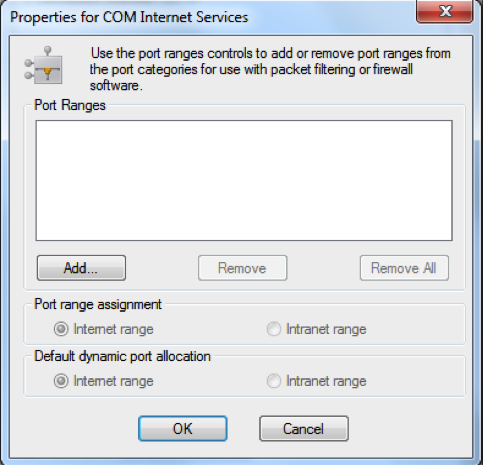
The ‘Connection-oriented TCP/IP’ protocol is set to use ‘Intranet Range’ when you view the DCOM properties of the machine:

o Run DCOMCNFG on the machine
o Under Component Service, go to Computers > My Computer
o Right-click My Computer and choose Properties
o On the ‘Default Protocols’ tab, choose ‘Connection-oriented TCP/IP’ and click Properties

By default, it should look like the screenshot below. If it is using the ‘Intranet range’ and no port ranges are assigned, then you probably have this problem.

Cause:

Actually, there was nothing much wrong with the WMI on that machine, and the problem wasn’t with WMI, neither in the DCOM security, which was all set correctly. It turns out that the DCOM ‘Connection-oriented TCP/IP’ protocol was set in the registry to use InternetPorts, yet no ports were defined, therefore no connections were being allowed. In the following registry key, there is no subkey called ‘Internet’ by default:

HKEY_LOCAL_MACHINE\SOFTWARE\Microsoft\Rpc

This is usually done for security reasons. But if the keys are not created correctly, for example you create the ‘UseInternetPorts‘ key, but don’t create the corresponding keys to define which ports are to be used, then RPC communication to that machine will fail.

Resolution:

In the case that you are not intentionally using pre-defined RPC ports, then simply delete the registry key HKEY_LOCAL_MACHINE\SOFTWARE\Microsoft\Rpc\Internet and all its subkeys, then reboot the computer, and RPC access will be restored.

You can use this Powershell script to delete the registry key on a remote computer. It will also get the logged on user, so you can ask them to reboot their machine.  It must be run as administrator, and with an account that has local admin rights on the remote computer.

Error Connecting to VPN – Error 850

May 28th, 2014 by Rossy Guide

What is that error?

When setting up a VPN connection on Windows 8, the following error is appears:

Error “850 The Extensible Authentication Protocol type required for authentication” of the remote access connection is not installed on your computer.


How it can be fixed?

For fixing the above error “850 The Extensible Authentication Protocol type required for authentication”, Please do the following steps below:


First open the VPN connection properties window.

In this, several readers have reported they are unable to access the properties via the above method. So the alternate method for opening the Network and Sharing Center is by right clicking on the mouse button on the network icon in the system tray.

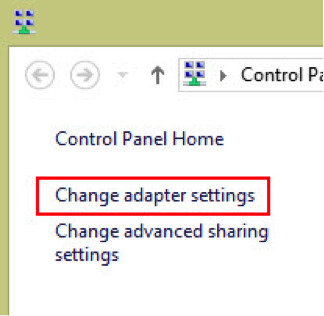
OR through the Control Panel like as follows.

After that, click on the Change adapter settings.

Next, right click on the mouse button on the VPN connection and then click Properties.

After done the above steps, click on the Security tab.

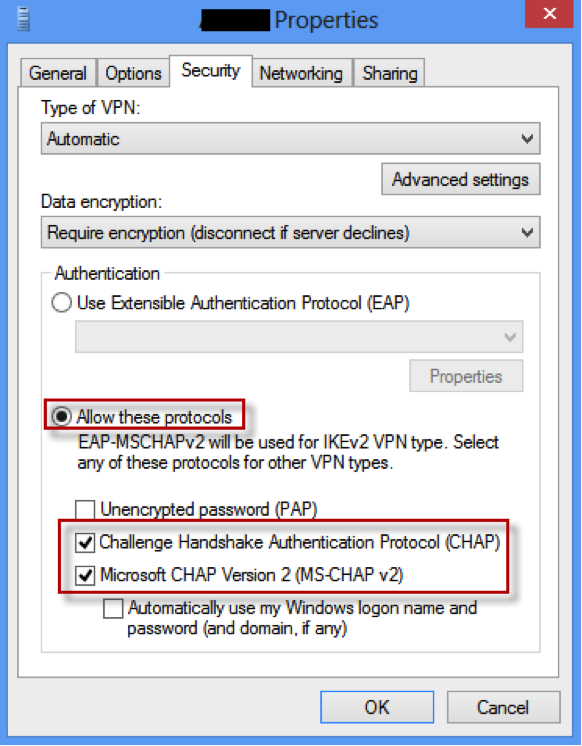
[Note the authentication radio buttons. Notice how neither of them are selected? It has therefore assumed a default option which isn’t appropriate for the network you are trying to connect to.]

Then, select the right authentication protocol. If it is a Microsoft PPTP implementation then please try the following configuration:

Finally click on the OK button and then attempt to connect again.

Folder is Too Long to Copy Issue

May 24th, 2014 by Rossy Guide

What is that issue?

If you work with Windows long enough, especially with folders and files that have long names, you’ll run into a bizarre error: Windows will report that the folder path or file name is too long to move to a new destination or even delete.

The problem you’re running into is an unfortunate intersection of two systems that, in cases like this, yields an error. To understand exactly where the error comes from, we need to dig into the history of Long Filenames (LFN) and how Windows interacts with them before we delve into solutions.

Long Filenames were introduced, through the underlying MS-DOS architecture, in Windows 95. The new LFN system allowed for file and directory names of up to 255 characters. This was a welcome expansion of the previous file name system, usually called 8.3 filenaming because the name was limited to eight characters and a three digit extension, but also known as Short Filename (SFN).

How it can be fixed?

So what happened when you were cleaning up your computer is that you had a directory with an already long path (either because the folder names were long, the file names were long, or both), and when you attempted to move one or more of those directories into another directory with a long path, the total length of the path name exceeded the 260 character limit imposed by the MAX_PATH variable.

If you have a huge number of files with a long path and you don’t want to edit them all (or if you want to delete a ton of old directories that are too long for Windows to deal with when restricted by the MAX_PATH variable), there is a command-line work around. Even though Windows is restricted by the MAX_PATH variable, Windows engineers realized there would be situations wherein users would need to deal with longer path names. As such, the Windows API has a function for dealing with extremely long paths.

It’s that ^^^ or u have too many folders in just one folder and remember all the folder names behind each other makes your error. Windows support only so many digits in the name and root of the folder. Go a few folders inside and shorten the names of the long name of the folder and extremely long file names.

In order to take advantage of that API and use command line tools on your unwieldy folders/file names, you simply need to append the directory name with a few extra characters. For example, if you had a huge directory structure that you wanted to delete (but received an error due to the path length when you attempted it), you could change the command from:

rmdir c:\documents\some-really-super-long-folder-name-scheme\

to:

rmdir \\?\c:\documents\some-really-super-long-folder-name-scheme\


The key is the addition of the \\?\ portion before the start of the file path; this instructs Windows to disregard the limitations imposed by the MAX_PATH variable and to interact with the path you just supplied as supplied/understood directly by the underlying files system (which can clearly support a longer path). As always, exercise caution at the command prompt to avoid accidentally deleting files or directories you intended to leave intact.

Elliptic Curve Cryptography (ECC)

May 21st, 2014 by Rossy Guide

What is this?

Elliptic Curve Cryptography (ECC) comes to public key cryptography based on elliptic curve theory that can be used to create faster, smaller, and more efficient cryptographic keys. Elliptic curves are also used in several integer factorization algorithms and ECC generates keys through the properties of the elliptic curve equation instead of the traditional method of generation as the product of very large prime numbers. The technology can be used in conjunction with the other popular algorithms such as RSA, and Diffie-Hellman.

ECC has a reputation of being quite complex and it has been integrated into popular open-source cryptographic software including OpenSSH and OpenSSL, and it’s not inherently any more difficult to use than RSA.

History:

ECC was discovered in 1985 by Victor Miller (IBM) and Neil Koblitz (University of Washington). Also, It was developed by Certicom, a mobile e-business security provider, and was recently licensed by Hifn, a manufacturer of integrated circuitry (IC) and network security products. RSA has been developing its own version of ECC. And many manufacturers, including 3COM, Cylink, Motorola, Pitney Bowes, Siemens, TRW, and VeriFone have included support for ECC in their products.

The equation of an elliptic curve is given as,


The following few terms that will be used,

E:    Elliptic Curve

P:     Point on the curve

n:      Maximum limit (prime number)

Simple elliptic curve


Key Generation

It is an important part where we have to generate both public key and private key. In this, the sender will be encrypting the message with receiver’s public key and the receiver will decrypt its private key.

Now, we have to select a number  ‘d’ within the range of ‘n’.

To generate the public key, using the following equation

Q = d * P

For above, d = the random number that we have selected within the range of (1 to n-1). P is the point on the curve. And ‘Q’ is the public key and the ‘d’ is the private key.

Encryption

Let ‘m’ be the message that we are sending. In this, we have to represent this message on the curve. These have in-depth implementation details. All the advance research on ECC is done by a company called certicom.

Consider ‘m’ has the point ‘M’ on the curve ‘E’. Randomly select ‘k’ from [1 – (n-1)].

Two cipher texts will be generated let them be C1 and C2.

C1 = k*P

C2 = M + k*Q

For the above, C1 and C2 will be send.

Decryption

We have to get back the message ‘m’ that was send to us,

M = C2 – d * C1

For the above, M is the original message that we have send.

Features:

ECC is an approach to public-key cryptography based on the algebraic structure of elliptic curves over finite fields. And Elliptic curve variants of cryptographic algorithms have the following practical features.

o They are small and fast.
o Creating a new curve is uneasy.
o Elliptic curves can be used to factor integers.
o Some elliptic curves allow for pairings.

DES, Breaking DES, and DES Variants

May 19th, 2014 by Rossy Guide

History of Data Encryption Standard (DES):

The origins of DES go back to the early 1970s. In 1972, after concluding a study on the US government’s computer security needs, the US standards body NBS – now named NIST — identified a need for a government-wide standard for encrypting unclassified, sensitive information. Accordingly, on 15 May 1973, after consulting with the NSA, NBS solicited proposals for a cipher that would meet rigorous design criteria. None of the submissions, however, turned out to be suitable. A second request was issued on 27 August 1974. The team at IBM involved in cipher design and analysis included Feistel, Walter Tuchman, Don Coppersmith, Alan Konheim, Carl Meyer, Mike Matyas, Roy Adler, Edna Grossman, Bill Notz, Lynn Smith, and Bryant Tuckerman.

The National Security Agency (NSA) assisted with the cryptographic algorithm evaluation processes, and in 1973, submission invitations were posted in the Federal Register. However, the submissions were unacceptable. In 1974, a second invitation was posted, which resulted in a submission from IBM. In 1975, technical specifications were published for comments in the Federal Register, and analysis and review commenced. In 1977, NBS issued the algorithm, i.e., DES, as Federal Information Processing Standards (FIPS) 46.

Shortly thereafter, the U.S. Department of Defense (DoD) implemented DES. Specifications are outlined in FIPS publication 46-3, FIPS 81, ANSI X3.92 and ANSI X3.106. For security reasons, the U.S. government has never authorized exports of this encryption software. There are at least 72 quadrillion DES key possibilities. In 1993, NIST recertified DES, and the Advanced Encryption Standard (AES) became its unofficial replacement.

What is this?

The data encryption standard (DES) is a common standard for data encryption and a form of secret key cryptography (SKC), which uses only one key for encryption and decryption. Public key cryptography (PKC) uses two keys, i.e., one for encryption and one for decryption.

Breaking DES:

Started 2006 with a third party scientific publication achieving a throughout of more than 65 billion keys per second using Xilinx Spartan-3 1000 FPGAs on a SciEngines COPACOBANA. SciEngines reported on July 15th 2008 to break DES in an average time of a single day using a setup of COPACOBANA.

o DES was standardized 1975, and already 1977 there was an estimate that a machine to break it would cost $20M (1977 dollars)
o DES was recertified in 1992 despite growing concerns
o One can use distributed computing, specialized hardware, or nowadays, cheap FPGAs
o The DES challenge in 1997 was broken in five months (distributed computation) having searched 25% of the key space (1998: 39 days, 85%)
o 1998: EFF DES cracker, parallelized, $200k, 4.5 days (on average)

DES variants:

DES also supports various modes to improve its security efficiency. DES also has two variants – 2DES and 3DES. DES still has the Man-In-Middle attack problem. A comparative analysis defined that 3-DES provides more security but memory usage of DES is less than 3-DES.

Double DES:


Double DES has a 112-bit key and enciphers blocks of 64 bits. DES is not a group; i.e., E(k2, E(k, p)) is not equivalent to DES encryption using a single key. Intuitively, double encryption should double the size of the key space. But, that is not the case with DES.

Triple DES – 3DES:

3DES was developed in 1999 by IBM – by a team led by Walter Tuchman. 3DES prevents a meet-in-the-middle attack. 3DES has a 168-bit key and enciphers blocks of 64 bits. 3DES effectively has 112-bit security. 3DES can be done with 2 or 3 keys.


3-key encryption


E (k3, D (k2, E (k1, p)))


2-key encryption


E (k1, D (k2, E (k1, p)))


One reason might be that by taking k2=k1; 2-key, 3DES becomes single DES with key k1. 3DES can communicate with single DES.


DES-X:


In cryptography, DES-X (or DESX) is a variant on the DES (Data Encryption Standard) symmetric-key block cipher intended to increase the complexity of a brute force attack using a technique called key whitening.


The original DES algorithm was specified in 1976 with a 56-bit key size: 256 possibilities for the key. There was criticism that an exhaustive search might be within the capabilities of large governments, particularly the United States’ National Security Agency (NSA). One scheme to increase the key size of DES without substantially altering the algorithm was DES-X, proposed by Ron Rivest in May 1984. DES-X augments DES by XORing an extra 64 bits of key (K1) to the plaintext before applying DES, and then XORing another 64 bits of key (K2) after the encryption:


The key size is thereby increased to 56 + (2 × 64) = 184 bits.


CSS Timing Functions

May 18th, 2014 by Rossy Guide

What is this?

The <timing-function> CSS data type denotes a mathematical function that describes how fast one-dimensional values change during transitions or animations. This in essence lets you establish an acceleration curve, so that the speed of the animation can vary over its duration. These functions are often called easing functions. People of the world, strap yourself in and hold on tight, for you are about to experience truly hair-raising excitement as you get to grips with the intricacies of the hugely interesting CSS timing function!

It is a function linking the time with a ratio of the output value, expressed as a <number>, with 0.0 representing the initial state, 1.0 the final state. The output ratio can be greater than 1.0 (or smaller than 0.0). This causes the animation to go farther than the final state, and then come back, in a kind of bouncing effect.

Nevertheless, if the output value goes outside of its possible range, such as a component of a color going greater than 255 or smaller than 0, the value is clipped to its closest allowed value (in the case of a color-component 255 and 0 respectively. Some cubic-bezier () curves exhibit this property.

How to understand it?

First of all, let’s set the scene and ensure we’re all familiar with the scenarios in which the timing function is relevant. As alluded to, the functionality becomes available when you’re working in the realm of CSS animation, which includes CSS transitions as well as keyframe-based animation.

The CSS Timing Function Explained:

It’s one of the less obvious animation-based CSS properties, whereas most of its counterparts are rather self-explanatory. Nevertheless, the gist of it is that it enables you to control and vary the acceleration of an animation; it defines where the animation speeds up and slows down over the specified duration.

While it does not affect the actual duration of an animation, it could have profound effects on how fast or slow the user perceives the animation to be. If you’re not sold having learned of its actual purpose, then stick with me here because the timing-function property gets a lot more interesting than the definition suggests.

Before moving on, let’s just familiarize ourselves with the syntax and where it fits into the whole process of defining an animation in CSS. To keep things simple, let’s use a CSS transition for this example. We’ll begin with the full array of transition properties:

div {transition-property: background;transition-duration: 1s;transition-delay: .5s;

transition-timing-function: linear;

}

/* This could, of course, be shortened to: */

div {

transition: background 1s .5s linear;

}


Looking Under the Hood:

Many of you probably don’t look past the available keywords for the timing-function property, of which there are five: ease (the default), ease-in, ease-out, ease-in-out and linear. However, these keywords are simply shorthands for defining the Bezier curve.

That’s right, when you use the Pen or Path tool to create a nice smooth curve, then you’re drawing a Bezier curve! Anyway, to get to the point of this section, the Bezier curve is the magic behind the timing function; it basically describes the acceleration pattern on a graph.

Introducing the cubic-bezier() Function

Now then, this really is where things get really exciting, as I reveal that you can certainly get access to this curve through the cubic-bezier() function, which can simply be used set up of the keywords of the timing-function property value. I appreciate that you might need a moment to contain your excitement… With the cubic-bezier () function, you can manipulate the Bezier curve whichever way you desire, creating completely custom acceleration patterns for the animation! So, let’s examine how this function works and how it enables you to definitely create your personal Bezier curve.

transition-timing-function: cubic-bezier(x, y, x, y);


Introducing the steps() Timing Function:

The steps() function is more of a nice tool, but it’s useful to have in the toolkit nonetheless. It enables you to break up an animation into steps, rather than the usual tweened motion that we’re used to.

div {
   transition: 4s steps(4);
}
 
div:target {
   left: 400px;
}


Creative Use Cases for Stepping Functions:

So you probably don’t have much of a need to animate a moving box in steps very often, but there are plenty of other cool uses for the steps() function. For example, if you have all of the sprites for a basic cartoon, then you could use this technique to play it through frame by frame, using just a couple of CSS properties! Let’s look at a demo and the code that makes it function.

div {
   width: 125px;
   height: 150px;
   background: url(images/sprite.jpg) left;
   transition: 2s steps(16);
   /* The number of steps = the number of frames in the cartoon */
}
 
div:target {
   background-position: -2000px 0;
}


Connect to Remote Sites With FTP Automation Component

May 17th, 2014 by Rossy Guide

Establishing a connection

To initiate a connection to a remote host, the address of the host, username and password must be set before calling the corresponding connection command. The Host method is used to set the host address. The HostEnc method is used to set an encrypted value for the host address. The User method is used to set the username. The UserEnc method is used to set an encrypted value for the username. The Pass method is used to set the password for the user account. The PassEnc method is used to set an encrypted value for the password.

The FTPConnect method can be used to establish a regular FTP connection with the remote host. The default port is 21. A different port can be explicitly specified if needed. The FTPConnectSSL method is used to establish an explicit secure FTPS connection while the FTPConnectSSLI method can be used to establish an implicit secure FTPS connection. The FTPConnectSSH method can be used to establish a secure SSH connection. IDL Definition of methods to establish connection with a remote host is shown below.

  HRESULT Host    ([in] BSTR b_hostname);HRESULT HostEnc ([in] BSTR b_hostname_enc);HRESULT User    ([in] BSTR b_username);

HRESULT UserEnc ([in] BSTR b_username_enc);

HRESULT Pass    ([in] BSTR b_password);

HRESULT PassEnc ([in] BSTR b_password_enc);


HRESULT FTPConnect     ([in, defaultvalue(21)] UINT n_port);

HRESULT FTPConnectSSL  ([in, defaultvalue(21)] UINT n_port);

HRESULT FTPConnectSSLI ([in, defaultvalue(990)] UINT n_port);

HRESULT FTPConnectSSLC ([in, defaultvalue(21)] UINT n_port);

HRESULT FTPConnectSSH  ([in, defaultvalue(22)] UINT n_port);


Example usage of methods to establish connection with a remote host (VBScript) is shown below.

app.Host = "localhost" 'hostname or IP address of remote site
app.User = "test"      'account username
app.Pass = "test"      'password for account

app.FTPConnect         'connect to site (default port is 21 for)
app.FTPConnectSSH 27   'connect to site using SFTP on port 27


The FTPDisconnect method can be used to disconnect from the remote host. The IDL Definition of method to disconnect from a remote host is shown below.


HRESULT FTPDisconnect ();


Example usage of method to disconnect from a remote host (VBScript) is shown below.


'disconnect from the remote site
app.FTPDisconnect


Checking connection status

The IsFTPSuccess method can be used to check the status of any method that begins with FTP. This method can be used to check if the connection to the remote host was successful. IDL Definition of method to check status of methods that starts with FTP is shown below.

HRESULT IsFTPSuccess ([out, retval] VARIANT_BOOL *f_is_success);


Example usage of method to check status of methods that starts with FTP (VBScript) is shown below.


'check if the connection was successful
If app.IsFTPSuccess Then
  'connection was successful
End If


Setting Local and Remote paths

The FTPSetPath method can be used to set the current local or remote paths by using the “local” or “remote” keywords and specifying the path name to be set. The IDL Definition of method to set local and remote paths is shown below.

HRESULT FTPSetPath ([in] BSTR b_localremote, [in] BSTR b_path);


Example usage of method to set local and remote paths (VBScript) is shown below.


'set the local and remote paths
app.FTPSetPath "local", "c:\\tmp"
app.FTPSetPath "remote", "/"


Public key authentication for SSH

The PKeyLoad method can be used to load a private key for passwordless login when connecting to a SSH based SFTP server. The name of the key file and the passphrase used to protect the private key must be provided. The IDL Definition of method to load SSH private key is shown below.

HRESULT PkeyLoad ([in] BSTR b_keyfile, [in, defaultvalue("")]
BSTR b_passphrase);


Example usage of method to load SSH private key (VBScript) is shown below.


'load private key for SSH public key authentication
app.PkeyLoad "c:\\myprivkey.pem", "mypassphrase"